This Guide is Outdated and Will be Updated Soon
Hello new bloggers + friends!
Do you know how to install WordPress, or was it done for you?
I was on Facebook the other day when I noticed the thread of a distressed newbie blogger. She had purchased a domain name and hosting package from Siteground, but was having trouble installing WordPress.
It reminded me of the time I that I bought a domain name and hosting package, then because I didn’t know what to next, I abandoned the entire idea of having my own website.
Talk about a bummer!
I can’t believe that I let that tiny bit of knowledge (or lack of) keep me from pushing forward!
That was several years ago now, but I wanted to say, “I get it!” I totally understand the confusion of web hosting, domain names, site builders, etc. There are still things I don’t understand, but I wanted to share this super easy-to-follow tutorial on how to install WordPress with Siteground.
Siteground is the hosting company I use and recommend, and they make it super easy to install WordPress (which is where all of the magic happens).
Exclusive 60% Discount on SiteGround Now!
But if for some reason you still need help, this tutorial is just for you!
This tutorial assumes you’ve already purchased hosting specifically through Siteground and already have a domain name with them.
I have a tutorial all about how to start a blog here, and it covers some of the same stuff, but this one is specifically on how to install WordPress.
You might need this tutorial if:
- You purchased a domain name but didn’t add a hosting package until later
- You purchased a domain name and hosting package but haven’t started building your site
- You have multiple domain names and switched which ones are on active hosting packages
- You just need help installing WordPress for any other reason!
Let’s get started!
How to install WordPress with Siteground:
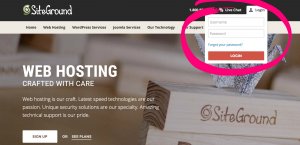
Step 1: Sign in to Siteground.
Duh! This may seem obvious, but I do have a few notes. Your sign-in information will be completely different than the sign-in info you use to access your site later. That’s something I failed to understand when I was starting out. You’ll use Siteground only to buy domain names, make changes to your hosting plan, etc. Your site will not be made or accessed here!
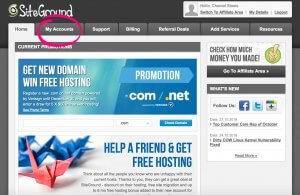
Step 2: Head over to your accounts.
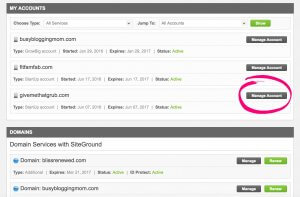
Step 3: Click “Manage Account” on the appropriate hosting account and domain name combo.
You should probably only have one domain name and one hosting package, unless you are like me and have issues. 😉 I have way too many hosting accounts and domain names. For this example, I’m using a random account with domain name “givemethatgrub.com.” This is the page you’ll see on this step (but you won’t have a big list like me!):
Step 4: Go to your cPanel.
This should be an orange button that takes you to your Control Panel for your hosting package. For me, there’s a little popup that says basically, “Are you sure?”
Hit, “Access cPanel securely” and “proceed.” (A lot can be done on your cPanel, so stay tuned for future tutorials.)

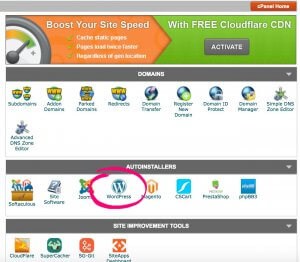
Step 5: Select the WordPress icon.
You’ll come to a page that has a ton of stuff, but for now, scroll down to “AUTOINSTALLERS”/strong>and select the WordPress icon. The page will look like this:
Step 6: Hit the install button.
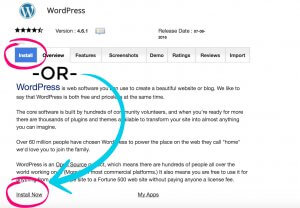
Step 7: Customize your settings. *Important*
You’ll want to change your domain protocol to, “http://www.yourdomainname.com.” HTTPS protocols are only for secure sites, which you probably don’t have (you’d know if you did).
Then, make sure the correct domain is selected. This should be automatic. Leave the “In Directory” option blank.
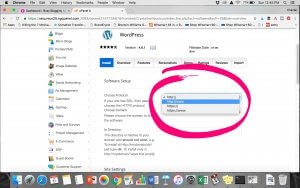
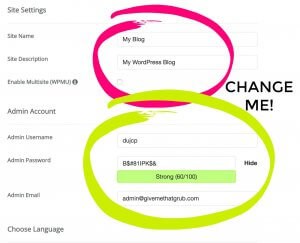
On that same page, scroll down and customize your Site Name and Site Description. These things will be used in searches, so don’t leave them as-is.
Next, make sure you pick a different username and password! You’ll use them each time you access your site and write blog posts. Write it down – you’ll need it in a different step.
You can choose to change your email or leave it as is. I just left mine and forwarded all of my mail to a Gmail account I have for this blog. (I’m working on a tutorial on that, too.)
Step 8: Complete installation + go to admin panel.
You’ll see a success page that looks like this:
![]()
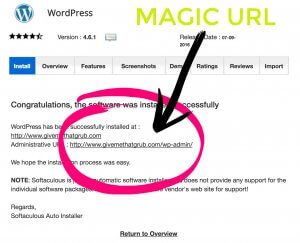
Copy and paste the “Administrative URL” – that’s your magic URL that will allow you to start building your site. It’s just your domain name plus “/wp-admin/” – save that baby. Bookmark it if you need to.
Step 9: Sign in to WordPress!
Take that URL you just copied and enter it into a new web page. Now enter in the username and password you created a few minutes ago. The page you’ll sign into regularly should look something like this:
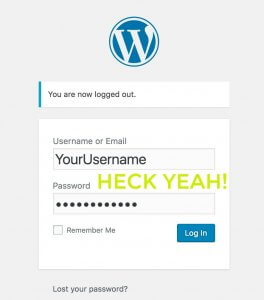
Congrats! You just learned how to install WordPress all on your own!
That’s it!
Now you can start writing blog posts and designing your site! (Stay tuned for tutorials on how to use WordPress!)
A few tips for the next steps:
- Play around with WordPress for awhile before advertising your site to anyone. Some bloggers suggest having ten blog posts written before going live. I say WHATEVER.
- You can make DIY logos in Canva or Picmonkey (free!)
- Consider making a mood board or style guide to decide what colors and attitude your blog should have before you go customizing it all. You can browse Pinterest with those keywords to get inspiration.
- A good theme is important for customization – I use Genesis + Avada right now.
- Don’t go too crazy with plugins! If you are unfamiliar with that term (or other blogging terms), you can check out this post defining them.
- Read this post about what to do and what to avoid in your first month blogging.
I hoped that helped! If you have any questions, please feel free to ask! I love helping new bloggers whenever possible!
Don’t forget that if you haven’t started a blog yet, this other tutorial is here to help!
Happy blogging,





Great tutorial! I like how you take us through every step like that. I remember how lost I felt when I first signed up to web hosting.
Yes! That’s exactly why I did it. Even the “quick start” guides can be confusing if you’re brand new.
Chantal,
Thank you. I am working on a freelance biz and your tutorial and comments in a FB group we are both part of helped me make a decision on hosting and Intstall WP – it seemed so daunting! Thanks for taking the scary out, now to the tinkering part. I also have an idea for a blog, more of a passion project, so your advice will come in double handy. Unless I decide to merge the two.
No problem Brandy! Thanks so much for stopping by!
I tried this, following your instructions to a T. No luck still, though. When I plug in the new wp-admin into a new tab, I get a message that says service is unavailable. Ideas? TIA.
same thing happened to me.. did i do something wrong???
I get the same message as Jamie!
Help! I have installed WordPress, but when I go to my website (even with the magic URL, it says that the website is coming soon. So I guess I can’t get into the back end where you log on.
Thank you so much for posting this tutorial! I was getting sooo frustrated with all the tutorial videos and websites out there. This post made it super easy and a breeze to set this up.
I have one question though! I changed the Protocol to “http://www” like your step 7 mentioned, and my website works with that protocol “http://www.wildvioletstudios.com” but how do i get just “wildvioletstudios.com” to show up? Right now, the default Siteground page pops up and says it’s still being built instead of redirecting to www. Is there another step I need to take for that?
Thank you!!
Violet
This was tremendously helpful! Only took a few minutes and saved me from stressing out.
Thanks soooo much!
Awesome tutorial and very nice blog site. I was debating whether or not to pay a web developer to just simply install wordpress as I now have Siteground hosting as well. Your tutorial answered that debate for me; I did it myself. Thanks for your efforts in providing such a detailed breakdown for us technically web challenged folks.
Much appreciated,
Orisa
Thanks, helpful
Thanks for the easy tutorial! I was all excited to finally purchase hosting and then it was like, ok what now? haha Appreciate the info!
This was SO helpful! Thank you!
Thank you so much for the easy step by step! Only problem is every time I copy and paste my admin url, it takes me to my blank go Daddy page and I can’t figure out next step. Has anyone else had this issue?
Thanks!!
I’m having similar issues that others noted, when I try to log into the admin, it says site not found. Feeling so over my head right now!
Just in case you haven’t figured this out yet, this was happening to me so I contacted my hosting service and it was because my domain wasn’t pointed towards them. It had something to do with the name servers. So maybe contact whoever you have your hosting through and see if they have any insights!
Hello Chantal!!
Great piece you have here.
My question is, what do you recommend to put in site name and site description?
Just one phrase/word, or a group of them separated by “commas”?
Thanks a million!
Almost-new-blogger
Thank you soo much this really helped! I was basically pulling my hair out but your steps made it simple.
Omg thank you!!!!!! Everything else I read and tried was so complicated I was almost in tears.
Thank you so much for the wonderful article! You saved me a few years (at least) of aging..;)
Hi,
I have just purchased a domain in siteground, when I go to install wordpress on this section Choose Installation URL the new domain is not there for me to select and upload wordpress to?
Any suggestions?
Very helpful. Thank you! I somehow managed to incorrectly install WordPress the first time so I “destroyed” the installation and found you in a search. This was simple and had no problems.
Most helpful post! Thank you for writing it.
Birgit